Children use crayons and drawing paper to chart the way the shadow of a ball grows as the ball is moved closer and closer to a light source.
Let’s find out how the size of the shadow changes when we move the ball.
The ball is far away from the light source. It is blocking a small amount of light. The shadow is SMALL.
Materials

- Strong LED flashlight or lamp (light source)
- Smooth ball (approximately the size of a tennis ball)
- Small clear plastic cup on which to balance the ball
- Chart paper
- Adult scissors
- Tape
- Crayons or markers (5 different colors)
Preparation
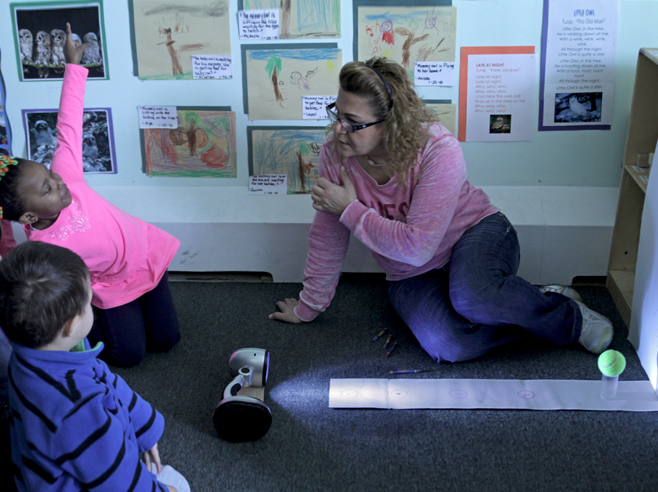
- Cut two (or more) strips of chart paper, each about 6 inches wide. Tape the strips end to end to form one strip that is 3 feet long.
- Measure and number five positions along the center of the strip. Use a different color for each number. Start by writing “1” about 6 inches from one end of the strip. Measure 8 inches past the 1 and write “2.” Measure 7 inches past the 2 and write “3.” Measure 6 inches past the 3 and write “4.” Finally, measure 5 inches past the 4 and write “5.” There will be about 4 inches left at that end of the strip. (See the slideshow images on the activity page to guide you in creating the strip.)
- Using the same colors (used for writing numbers) and the plastic cup as a template, trace a circle around each number.
- Place the paper strip on the floor or a tabletop, with the circle 1 end touching the wall. Position the flashlight (or lamp) at the opposite end of the strip, pointing toward the wall. (See slides for a visual.)
- Balance the ball on the cup and move it from circle 1 to circle 5, noticing how the size of the shadow on the wall increases each time.
- Attach chart paper to the wall so that all five shadows fall within the borders of the paper. You may need to tape two pieces of paper together. Children will trace the five shadows on this chart paper to make a Shadow Size Chart. If needed, adjust the position of the flashlight and paper strip to allow for this.
Directions: Lesson 4
Guided Small Group
- Darken the area of the room where you have set up the Charting Shadows materials. Examine the setup with your small group and ask the children to predict what sort of experiment you are going to do with the materials. Ask them to explain the reasons for their predictions.
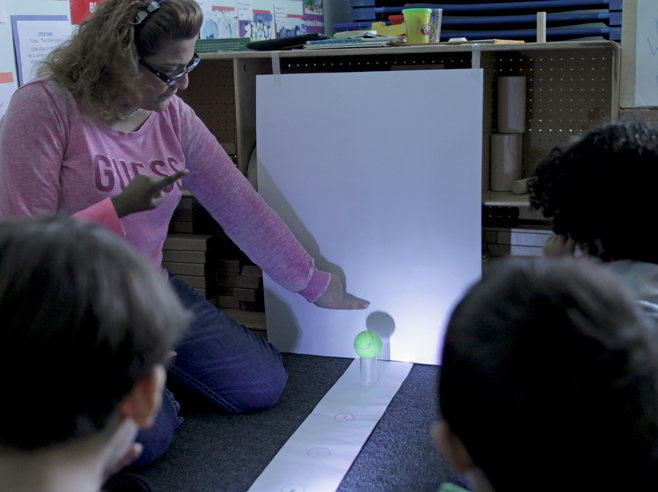
- Start with the ball, balanced on the cup, in circle 1, quite close to the wall. Have children point to its shadow on the wall surface. Ask a child to trace the outline of the shadow with the same color as circle 1.
- Tell the class you will be moving the ball to circle 2. Possible discussion ideas:
- Is circle 2 closer to the light or farther from the light?
- Do you think the shadow of the ball will change when we move it from circle 1 to circle 2?
- Do you think the ball will block more or less light?
- How do you predict the shadow will change?
- Have a child move the ball to circle 2 and let the class confirm or correct their predictions. Have a child trace around the shadow of the ball, using the same color as circle 2.
- Continue to move the ball closer and closer to the light source. Children will continue to make predictions, observe, describe, and trace the shadow outline, using a different color each time.
- Take time to examine the completed Shadow Size Chart with the children. What do you notice? What does this chart show?
- Encourage children to make predictions and test them out. Use the completed Shadow Size Chart to practice prediction and reinforce science concepts. Possible discussion ideas:
- On which circle do you think we should put the ball so that the shadow is the size of this smallest shadow outline? Why do you think that? Let’s try it and see. Were we correct?
- On which circle do you think we should put the ball so that the shadow is the size of this biggest shadow outline? Why do you think that? Let’s try it and see. Were we correct?
- Save the Shadow Size Chart for Circle Time: Wrap-Up as well as the Shadow Review Circle Time: Introduction activity.
Circle Time: Wrap-Up
- Display a Shadow Size Chart created during a Guided Small Group session and remind children of the activity they did with the flashlight (or lamp) and the ball. You may also want to display the setup used for the Charting Shadows activity.
- Encourage children to think about the changing size of the shadow. Let’s think about how to make a shadow get bigger. Possible discussion ideas:
- How did we make the shadow of the ball get bigger?
- Why is the shadow bigger?
Directions: Lesson 5
Guided Small Group
- Darken the area of the room where you have set up the Charting Shadows materials. Examine the setup with your small group and ask the children to predict what sort of experiment you are going to do with the materials. Ask them to explain the reasons for their predictions.
- Start with the ball, balanced on the cup, in circle 1, quite close to the wall. Have children point to its shadow on the wall surface. Ask a child to trace the outline of the shadow with the same color as circle 1.
- Tell the class you will be moving the ball to circle 2. Possible discussion ideas:
- Is circle 2 closer to the light or farther from the light?
- Do you think the shadow of the ball will change when we move it from circle 1 to circle 2?
- Do you think the ball will block more or less light?
- How do you predict the shadow will change?
- Have a child move the ball to circle 2 and let the class confirm or correct their predictions. Have a child trace around the shadow of the ball, using the same color as circle 2.
- Continue to move the ball closer and closer to the light source. Children will continue to make predictions, observe, describe, and trace the shadow outline, using a different color each time.
- Take time to examine the completed Shadow Size Chart with the children. What do you notice? What does this chart show?
- Encourage children to make predictions and test them out. Use the completed Shadow Size Chart to practice prediction and reinforce science concepts. Possible discussion ideas:
- On which circle do you think we should put the ball so that the shadow is the size of this smallest shadow outline? Why do you think that? Let’s try it and see. Were we correct?
- On which circle do you think we should put the ball so that the shadow is the size of this biggest shadow outline? Why do you think that? Let’s try it and see. Were we correct?
- Save the Shadow Size Chart for Circle Time: Wrap-Up as well as the Shadow Review Circle Time: Introduction activity.
