Children plant bean seeds in two different ways. First, they place seeds in a plastic sandwich bag with a moist paper towel. Then they plant bean seeds in soil.
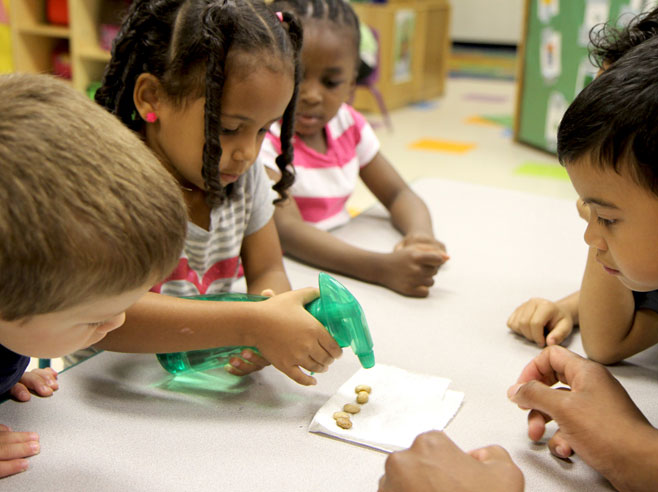
Put bean seeds on a paper towel and spray with water.
Then put the seeds and paper towel in a plastic bag and zip it shut.
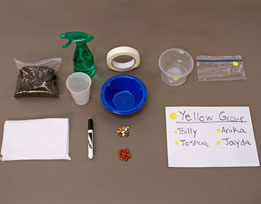
Materials
- For Guided Small Groups
- 2 presoaked kidney beans per child
- 1 small paper towel per group
- 1 sealable plastic sandwich bag per group, with a color-coded label (orange, yellow, green, blue, or purple)
- Potting soil
- 1 plastic container (e.g., round takeout containers) per group, with a color-coded label (orange, yellow, green, blue, or purple)
- 1 plastic bowl per group, large enough to place under each container
- Cup
- Water spray bottle
- Small poster for each group, displaying the group color and the names of the children in the group
- Adhesive labels or masking tape
- Marker
- Optional: Additional plastic containers (to plant additional seeds)
- For Circle Time: Wrap-Up
- Container of soil in which bean seeds have been planted
- 3–4 containers of potting soil in which to plant Class Garden seeds
- 3–4 plastic bowls to place under containers of potting soil
- 3–4 sealable plastic sandwich bags in which to sprout Class Garden seeds
- 3–4 small paper towels
- 3–4 different types of presoaked seeds for Class Garden planting (good fast-growing choices include sunflower, nasturtium, radish, cat oats, chickpeas, and lentils), 6–8 seeds of each type
Preparation
- Select three to four different types of seeds for the Class Garden (planted during Circle Time: Wrap-Up). Good fast-growing choices include sunflower, nasturtium, radish, cat oats (from pet store), chickpeas, and lentils (from grocery store). Feel free to try other seeds as well.
- The day before the plant unit begins, soak the bean and other seeds overnight in cool water, in preparation for planting. This will make them germinate more quickly.
- Gather or make five color-coded labels for each group, matching the digital journal color labels: Orange, Yellow, Green, Blue, Purple. Label the plastic sandwich bags and containers with color-coded labels so each group can easily identify their own bags and containers.
- For the Class Garden bags and soil containers, add a label with the name of the seed. You may want to attach a dry seed to the label on the sandwich bag and the picture from the seed packet to the label on the soil container.
- Create group posters displaying the color name of the group (for example, Orange Group) and the names of the children in the group.
- Plant a few presoaked bean seeds in one or more sandwich bags and one or more containers of soil as backup for any seeds that do not grow.
Directions: Lesson 1
Guided Small Group
- Point out the group poster. Tell children that they will be working together as a group to plant and care for their bean seeds and to take photos of them as they grow. Point out the color label on the poster, the plastic bag, and the plastic container.
- “Plant” bean seeds in a plastic bag. Fold the paper towel to fit in a plastic sandwich bag. Let a child put a bean seed on the paper towel, then wet the towel and put it in the bag. Take a moment to think about why we are putting a wet towel in the bag with the bean seeds. Who would like to share their idea? (Seeds need water to grow.) After a child shares, restate his or her idea. Does anyone have a different idea?
- Explain that because the plastic bag is clear, they will be able to see how the seeds in the bag start to grow and change. However, closed plastic bags are not the best place for plants to grow big, so the group will also plant some seeds in a container of soil.
- Plant bean seeds in soil. Let children fill a plastic container most of the way with potting soil, then spray water on the soil to make it moist. Have each child place a presoaked bean seed on top of the soil. Finally, cover the seeds with a thin layer of soil (¼–½ inch deep).
- Have children spray the soil on top of their seeds with water. The soil above and below the seeds should be thoroughly moist.
- Encourage children to talk about what they are doing, what they observe, and what they think and wonder. Possible discussion ideas:
- Why do you think we’re putting water on the soil that covers our seeds? What do you think would happen if we didn’t put water on the soil?
- What do you think it is like for the seed under the soil? Is it light or dark? Dry or wet?
- Do you think we will be able to see when the bean seeds first start growing? Why or why not? Discuss how the sprouts need to appear above the soil in order to be seen. Remind children that they will be able to watch the bean seeds in a clear plastic sandwich bag begin to sprout and grow.
- Have children wash and dry their hands before proceeding to the next activity.
Circle Time: Wrap-Up
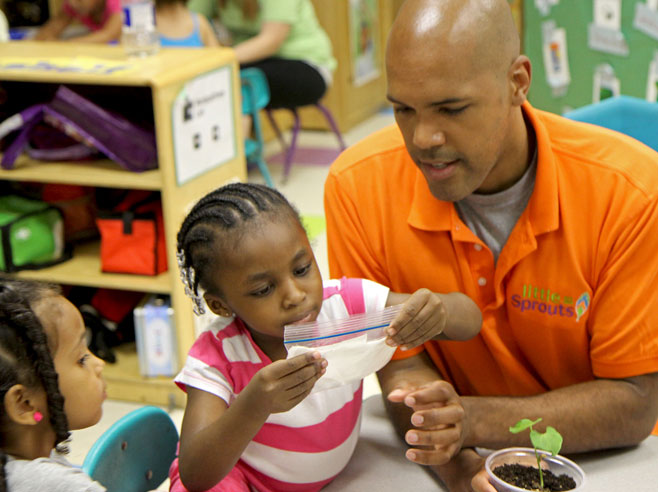
- Display a container of soil in which bean seeds have been planted. Ask children to tell the story of how they planted their beans seeds in soil.
- Ask questions to elicit a step-by-step retelling: First, what did we put in the containers? What did we do next? What did we do last? Encourage children to act out the steps.
- Invite children to make predictions.
- When do you predict the first bean plant will pop out of the soil? Tomorrow? Next week?
- What color do you think that bean plant will be?
- Plant other seeds for the Class Garden. Present a different type of seed, introducing it by name. Ask children to describe the seed. Show a bean seed for comparison. Possible discussion ideas:
- How is this seed the same as or different from our bean seed?
- Do you think the plant that grows from this seed will be the same as or different from the plant that grows from our bean seed?
- Why do you think that?
- Do you agree with (child’s name)’s idea? Tell us why you think that.
- Do you have any questions about this seed?
- Have children help you “plant” the seeds on a damp paper towel in a labeled sandwich bag and in a labeled container of damp potting soil.
- Repeat with two or three other sets of Class Garden seeds. As you plant the Class Garden, discuss how to take care of plants. What do we need to do?
