Children compare the distance two identical objects travel when they slide down a smooth ramp and a rough ramp. They use the digital Ramps Journal to make predictions and document and analyze results.
Let’s predict which ramp will make the object go farther: the smooth ramp or the bumpy, rough ramp.
Ready to test it out? We’ll take a video of the experiment.
Materials
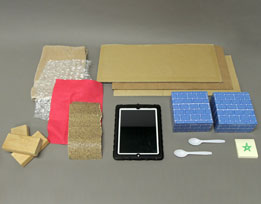
- Smooth & Rough Ramps tool in the digital Ramps Journal on 1 or more iPads (Ideally, use a different iPad for each Guided Small Group.)
- 3–4 identical cardboard ramps (approximately 18″ long)
- 2–3 different-textured materials to wrap around ramps, such as felt, coarse sandpaper, large bubble wrap, a towel, nonslip shelf liner, carpet sample, crinkled aluminum foil
- Cardboard blocks to prop up one end of the ramps
- Pairs of identical objects to slide down ramps, such as plastic spoons, small connecting cube towers, dice, cardboard blocks, craft sticks
- Small sticky notes
- Tape (masking)
- Optional: Tape measure
Preparation
- Leave one cardboard ramp bare. Wrap textured materials around the remaining two or three ramps. Tape materials onto the ramps. (See Materials list for textured materials.)
- Test out your materials to determine how steep to make the ramps. You will want the ramps to be fairly steep so that most objects will slide at least a little way down the “rough” ramps.
- Familiarize yourself with the Smooth & Rough Ramps tool in the digital Ramps Journal. Audio and text directions in the app will walk you step by step through this integrated hands-on digital activity.
Directions: Lessons 9, 10
Guided Small Group
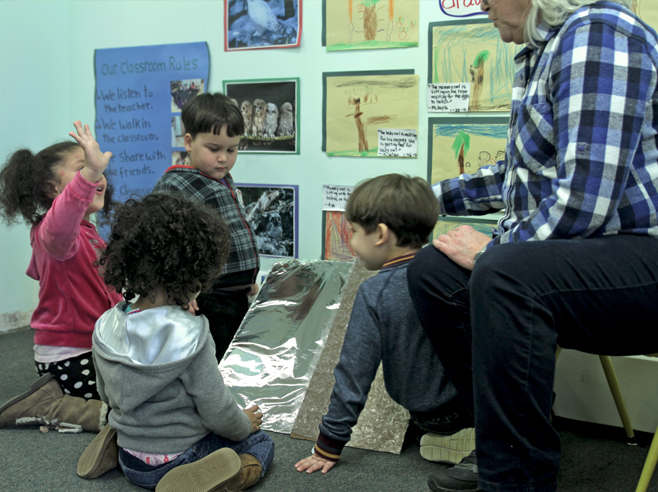
- Hands-On Experiment. Have children touch and describe the textures of the bare ramp and the ramps with materials taped to the surface. Then have them select one of the bumpy, fuzzy, or scratchy ramps to use for their experiment, along with the smooth, bare ramp (or make the selection yourself). Have children help you set up the two ramps side by side. The ramps should have the same steepness.
- Have children select two identical objects to slide down the ramps: for example, two craft sticks. Possible discussion ideas:
- Which ramp do you predict will make a craft stick slide farther? This smooth ramp? Or this (rough/bumpy/fuzzy/scratchy) ramp?
- Why do you think that?
- Encourage children to listen to and build on their classmates’ responses.
- You may want to reintroduce the concept of friction. Rub your palms together to demonstrate the concept of friction. When there is more friction, an object slides more slowly. Which ramp do you think will have more friction with the craft stick?
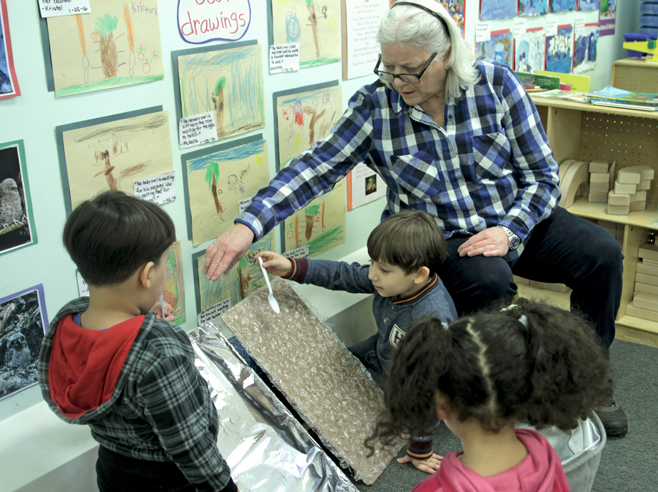
- Have two children hold the objects at the top of each ramp and gently release them when their teammates say, “1, 2, 3, Go!” Possible discussion ideas:
- Which craft stick slid farther?
- Was our prediction correct?
- Why do you think the smooth ramp made the craft stick slide farther?
- Use a sticky note to mark how far each object slid, and run the test again to see if you get the same results. Compare the results. Possible discussion ideas:
- Which craft stick went farther? How much farther did it slide than the other stick?
- Which stick went the shortest distance? Why do you think that is?
- Ramps Journal: Smooth & Rough Ramps. Tell children that they are going to use the Ramps Journal on the iPad to make predictions and document information about their ramp experiments. On the index screen, tap to open Smooth & Rough Ramps: Experiment. The audio will walk you step by step through the experiment. On each screen, you can replay the audio by tapping the icon of the in-game character, Nor, in the top left corner of the screen.
- Listen to Nor introduce the activity by asking the question: Which ramp makes an object go farther? Point out that there is a smooth ramp and a rough ramp. Tap the green arrow button to start the experiment.
- Step 1: Set Up Experiment. Listen to Nor’s prompt. Tap the orange camera button. Help a child frame and take a photo of the object children will use in their first experiment—for example, the plastic spoon.
- Step 2: Predict. Have children note that a photo of the plastic spoon now appears in the circle at the top of each ramp.
- Help children match the diagrams of smooth and rough ramps on the iPad with the actual smooth and rough ramps the children are using in their experiments.
- Which ramp do you think will make the spoon slide farther: the smooth ramp or the rough ramp? Why do you think that? When children agree on a prediction, let a child tap the matching picture.
- Step 3: Listen to Nor’s directions. Tell children that they will take turns video recording the experiments.
- Invite one child to be the first videographer. You will be the videographer’s assistant, helping him or her hold the iPad steady and capture the action.
- Choose two other children to hold the plastic spoons at the top of the smooth and rough ramps. Remind them that they will not push the spoons. Their job will be to just let go of the spoons and see how far the spoons slide on their own.
- Show the videographer where to stand: either slightly behind and to the side of the ramps, or directly in front of the ramps. Help the videographer frame the ramps and the area directly in front of the ramps on the iPad screen.
- Have the videographer tap the video record button on the iPad. Lead the rest of the group in chanting along with Nor: “Ready? Set? Go!” The video starts recording automatically on “Go!” The children should let go of the spoons on “Go!”
- Let children declare which spoon slid farther. Leave the spoons where they are. (You will document the distance each slid in Step 4.)
- Tap the orange play button to watch the video together and confirm the results. Which spoon slid farther: the one that came down the smooth ramp or the one that came down the rough ramp? If needed, you can rewatch the video by tapping the button in the upper left corner. Tap the green arrow in the lower right corner to go to the next screen.
- Step 4: Document. Listen to Nor’s directions and watch the demonstration of how each on-screen object can be dragged down the ramp and, if appropriate, across the “floor” of the ramp diagram.
- Have children make judgments about the distance the plastic spoons in your experiment slid. When the spoon came down the smooth ramp, how far did it slide? Did it stop on the ramp or make it to the bottom? Did it keep sliding just a little way on the floor, or did it slide pretty far?
- On the iPad, let children take turns dragging the circle down the smooth ramp and an appropriate distance across the floor. Repeat these steps for the rough ramp. You can tap the Observe button at the top and then the orange video button if you want to rewatch the video.
- Step 5: Compare Results. The ramp that made the object slide farther is marked with a burst of stars on the iPad. Possible discussion ideas:
- Which ramp did we predict would make the spoon slide farther: the smooth ramp or the rough ramp?
- When we did our experiment, which ramp actually did make the spoon slide farther? Was our prediction correct?
- What did we learn from this experiment?
- Tap the green Done button to save the experiment and return to the activity index.
- Repeat the Smooth & Rough Ramps experiment with two or three other pairs of identical objects: two connecting cube towers, two cardboard blocks, two craft sticks, and/or two dice. The app on your iPad will walk you step by step through the process each time. After you have recorded a second pair of objects, have children pick a different rough-textured ramp for the next experiment.
- Review Results. When you have completed your last experiment, go to Smooth & Rough Ramps: Results to see the results of all the groups’ experiments on one chart.
- Draw attention to the stars on the chart.
- In (most/all) of these experiments, which ramp made the object go farther: the smooth ramp or the rough ramp? Why do you think that was?
- If we did more experiments like this, with two objects that are the same, do you think the object on the smooth ramp would always go farther than the object on the rough ramp?
- If you wish to rewatch a particular video, tap the object in the top row or anywhere in the column below it.
- Tell children that they will be able to do more experimenting on their own with textured ramps in the Learning Center.
